Showing posts with label DIY. Show all posts

Saturday, March 8, 2014

On the Needles: Boat Neck Faux Rib Pullover, Part 1

I'm excited to start sharing my knitting (and sometimes crochet) projects with you in my "On the Needles" blog series!


Meet the Boatneck Faux Rib Pullover (pictured on cover). This is my first sweater project, and so far, it's knitting up like a dream. The pattern is from the Boyfriend Sweaters book, by Bruce Weinstein. 

I chose the Boatneck Pullover for a few reasons:
1. Who doesn't love a slouchy, oversized sweater?
2. The skill level of the project is easy.
3. The stitch is stylish and unique, while being simple. I really didn't want a sweater in garter stitch. The garter stitch is lovely, but it's not what I wanted in a sweater. 
4. The finished sweater will be reversible. Two styles in one!
5. Since it's an oversized sweater, it's a more forgiving project. It doesn't have to fit exact measurements. 


I chose Patons Classic Wool DK Superwash yarn, in Dark Grey Heather. Since this is my first sweater project, I wanted a fairly inexpensive — but not 100% acrylic — yarn that I could buy at my local craft store. Also, by not making a sweater that cost $100+, I will actually feel like I can wear it without fear of messing it up!


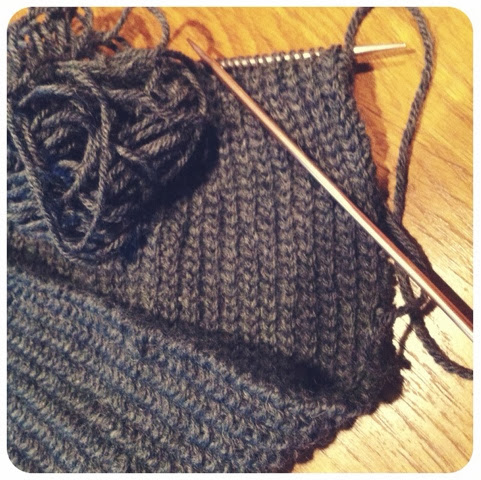
Here's a shot of my current progress. You can see what a nice texture the faux rib stitch creates!

So those are the details on my current project. I'll keep you updated as it progresses. 

What are you currently knitting or crafting?

— Courtney

All photos taken by Courtney and edited with Afterlight and Instagram.

Tuesday, February 25, 2014

Homemade Vanilla Milk

Okay. Ready for a delicious hug in a mug?

It's super simple. So simple, it's actually kind of ridiculous.

All you need is milk, vanilla extract, and sugar (honey instead of sugar will work too!). Whipped cream and marshmallows are highly recommended, but not necessary.


Heat your milk in a saucepan. Add a splash of vanilla and a couple of spoonfuls of sugar (I'm just going to say add as much vanilla and sugar you want, to taste. I prefer sweeter, but that's just me.). Wisk until the sugar is dissolved. Boom. Done.


Pour into a big mug and top with whipped cream and/or marshmallows! I didn't have any marshmallows. Sad face.


Enjoy! Seriously though. A mug of this before bed, or on a cold day and whoa. It's like being wrapped up in a soft blanket with a fluffy puppy while wearing your favorite fuzzy robe.

❤️Sara

Photos taken by Sara and edited with Afterlight. 

Saturday, February 15, 2014

Snow Day!

SNOWWWWWWWW DAYYYYYYYY!!!!!!!!!!!


Can you tell I'm excited?

I spent my snow day watching the Olympics and knitting my sweater (more on that in the future!) . . .


I did do a little work, so I wasn't totally unproductive. But that's not entertaining, so I didn't take pictures. 


I needed a last minute Valentine Gift, so I whipped up this little trivet. Thank you, Wild Olive, for your incredibly easy tutorial!

The finished product! I had a great little stash of fat quarters that I bought from The Quilter's Haven in Menominee, MI. Their fabrics are outstanding in quality, and they were perfect for this project!

So my snow day consisted of Olympians and crafting, with lots of eating in between. 

How did you spend your snow day?

 - Courtney


All photos taken by Courtney and Sara and edited with Afterlight and Instagram.


Thursday, December 19, 2013

Chocolate Hazelnut Chex Mix

Every year, there's some type of work shindig that requires me to bring food of some sort, and of course I lean toward the dessert side of things. I usually make this Chex Mix "Puppy Chow" or "Muddy Buddies", but this time I put a different spin on it.

I saw this YouTube video and instantly knew I had to make this. I mean, it has Nutella in it. Need I say more?

Here's what you'll need:
- 9 cups rice Chex cereal (You could also use corn and/or chocolate Chex)
- 1 cup semisweet chocolate chips
- 1/2 cup Nutella
- 1/4 cup butter or margarine
- 1 teaspoon vanilla
- 1 1/2 cups powdered sugar

Here's what you do:

1. Measure your cereal and put it aside in a big bowl.

2. Melt your chocolate chips, Nutella, and butter until smooth. You can microwave it in 30 second increments, or use a double boiler, like I did. Once everything is melted, stir in the vanilla.


3. Pour the mixture over your cereal and gently stir it together until everything is evenly coated. Be careful not to break up the cereal! My chocolate mixture wasn't smooth like it's been when I've made this before, but it still coated the cereal just fine.


4. After it's all coated with chocolate, pour it into a large zip lock bag, add the powdered sugar, seal the bag (this part is very important!), and shake to your heart's content!


After everything is coated with the powdered sugar, I usually pour the mixture out on some wax paper to let it cool down and to get some of the moisture out.
 

And voila! You're done!
 
This was the first time I've used Nutella instead of peanut butter, and I couldn't really taste a difference, but it was still delicious! Seriously, you'll be lucky if you don't eat it all before you take it to your party.
 
Enjoy!
 

 If you make this, show me! Post your pictures on Instagram and hashtag it #BTPuppyChow so I can see!

Until next time,
♥Sara


All photos by Sara and edited with Afterlight and A Beautiful Mess.

Saturday, August 3, 2013

DIY: Souvenir Boxes

Souvenir boxes are a wonderful way to make someone feel as if they were a part of your trip. They're also really fun to curate! Here are some ideas from the box I put together for Sara:


Sara is an intense baseball fan! So throughout the trip I picked up team schedules and postcards of stadiums (1). She says she's not into football, but I know the Packers are her favorite. ;)

Peanuts from the plane, hotel notepads, and a continental breakfast cappuccino mix (2) help document the travel aspect of my trip.

Chocolates from the cheese shop are a local treat, and so are the sugar packets! (Hey, it's pure Michigan sugar!) Pine trees abound in Wisconsin, hence the tiny pinecone (3). If you're headed to the beach, seashells would be a fun add-in.

Stop by travel centers for oodles of local info for your box! That's where I found the postcards (4) — which I wrote messages on, a cheese guide (we are in Wisconsin, after all!), and maps of the local downtown with all of my favorite shops (5).


Take out menus from favorite cafes are a fun addition, too. I wrote all over this coffee shop menu, marking the things I knew Sara and I would try if we were on a coffee run.


Packaging multiple items from one place jazzes up your box, too. This coffee shop sold earrings by a local artist. I wrapped them up with the sleeve from my latte and a frequent customer card.


Once you've accumulated your fabulous treasures, pack everything in a flat-rate box and drop it off at the post office.

You'll be amazed how many fun things you'll find to document your trip that you might have overlooked before! Happy hunting!

❤ Courtney


Saturday, May 25, 2013

DIY: Travel Stationery Portfolio

Letters. There's something so special about opening the mailbox and finding a handwritten note in a colorful envelope with your name on it! I adore receiving letters, but I enjoy being the one behind the writing. When I'm traveling for a few days, I like to take some stationery with me — you never know when something newsy is going to happen! Here's a quick DIY for a Stationery Portfolio.


Supplies:

- 4 greeting card size envelopes
- Markers
- Assorted stationery
- Assorted envelopes
- Postage stamps
- Assorted stickers


To make the portfolio, moisten the glue on the flap of one envelope, and place another envelope over it — lining up the bottom of one envelope with the crease of the flap on the envelope with the glue. Do this three times, so all your envelopes are attached.


 Decorate your envelope pockets and stuff them with stationery goodies!


Fold up your portfolio (one right envelope, one left envelope, then close it like a book) and decorate the front if you'd like. I made this as a little "Welcome Summer" gift for my friend, Beverly — another avid mail lover! To finish it off, I tied it with a ribbon and inserted a pen under the bow.

This method also makes a handy coupon organizer for your purse, using smaller envelopes. 

Happy crafting and happy weekend!
♥Courtney


Saturday, April 27, 2013

Sticker Card DIY

A while ago I stumbled upon some cute coffee stickers. They're too fun to just stick on something that will be thrown away and not noticed, so I decided to make some simple cards with them.


Photobucket Pictures, Images and Photos

Supplies:
- Medium/Large stickers
- Washi tape
- Colorful card stock
- White paper

Photobucket Pictures, Images and Photos

Cut and fold your card stock to desired size, and decorate with your fabulous stickers! I added some steam swirls to the coffee cups to jazz it up.

Photobucket Pictures, Images and Photos

Cut your white paper a little smaller than your card. Position it on the inside of your card, and tape it in place with Washi tape.

Photobucket Pictures, Images and Photos

These cards are simple, but I think they turned out cheery and fun, and will brighten a few mailboxes.

❤ Courtney

Tuesday, April 2, 2013

Notebook Organization


Starting a new blog can be a little overwhelming - so many ideas! These are just a couple of things I did that might help you with your notebooks or planners to help you keep track of to-do lists, post ideas, and first drafts!

I found this notebook at Barnes & Noble. I love the bright color and the cassette tapes (Does anyone else miss mixed tapes?)!


I like love using sticky notes to help me organize and keep track of what's going on, so I stocked up on some yesterday. I use them for lists, marking pages, and jotting down ideas here and there. Colored pens and highlighters are also great for keeping notes. I love using colors to write down notes.
 
These sticky tabs are lifesavers! They're perfect for categorizing and the colors are fun (Can you tell I like using colors?).
 
Yup. I'm crazy. I actually labeled my labels. I trimmed the sticky part of a sticky note off and put them on the back of my tabs holder. Maybe this is a little much, but it doesn't hurt, right?

If you have any ideas on how to keep things in order, let me know, because I could always use some more organizing tips.
 
♥Sara